So you went ahead and purchased that System 76 laptop or you decided to finally install Linux on your laptop. You now have a Linux based laptop with a webcam. But how do you take advantage of this hardware? You want to be able to use that web cam to upload photos to facebook (or the like), but are not sure exactly how to use your hardware. It’s simple with a handy little tool called Cheese.
Cheese is not one of those applications that is going to make or break your desktop experience. But it certainly will enhance it. You can take standard pictures and even add effects to those pictures And Cheese doesn’t just do pics, it can do videos as well.
Getting and installing
Even though Cheese is a part of the GNOME desktop, it isn’t always installed by default. To install Cheese open up your Add/Remove Software utility, search for “cheese” (no quotes), select the results, and click Apply. To start Cheese look in the Graphics submenu of the Applications menu.
 Figure 1
When you fire Cheese up it will instantly start seeing you. Figure 1 shows me stalking a penguin through the eyes of Cheese. You will also see two photos I have already taken of myself.
To snap a photo of yourself place yourself in the position (or goofy face) you want and press the Take A Photo button.
When the photo is snapped it will appear in the lower pane of the application.
Now those photos you have taken have not been saved. You must actually save them before you can use them. To save a photo right click the photo and select “Save As”. By default photos are saved in the ~/Pictures/Webcam directory and can only be saved in .jpg format.
From that same right menu you can choose to send a picture to a removeable device, import the photo into F-Spot, open the photo, or send the photo to the trash. There is one other option “Set as Account Photo”, which is supposed to set a photo to your About me and your login photo. I have yet to get this to work.
Effects
You can even add effects to a photo. You actually add the effects before the photo is taken, and you can add more than one effect if you like. To add effects click the Effects button to list all of the possible effects.
 Figure 2
As you click on an effect it will be highlighted. Click on as many effects as you like, but know that the more effects you add the slower Cheese will get (especially when adding effects like Vertigo and Warp.)
After you select the effects you want click the Effects button again and you will be returned to the normal screen, only now your photo will be “enhanced” by the effects you have chosen.
You can see the right photo of me was with the Vertigo and the Warp effects running.
Countdown
You will notice, in the Cheese main menu, a Countdown entry. If this entry is checked there will be a delay in the photo taking (so you can make yourself as photogenic as possible.) If you would prefer instant results uncheck that entry and photos will be snapped as soon as you hit the Take a Photo button.
Final thoughts
Cheese is not going to make you a more productive worker. In fact, it’s just fun enough that it might make you a less productive worker. But when you need that interface to your trusty webcam, just say “Cheese” and you’ll be ready every time.
Cheese is not one of those applications that is going to make or break your desktop experience. But it certainly will enhance it. You can take standard pictures and even add effects to those pictures And Cheese doesn’t just do pics, it can do videos as well.
Getting and installing
Even though Cheese is a part of the GNOME desktop, it isn’t always installed by default. To install Cheese open up your Add/Remove Software utility, search for “cheese” (no quotes), select the results, and click Apply. To start Cheese look in the Graphics submenu of the Applications menu.
Figure 1When you fire Cheese up it will instantly start seeing you. Figure 1 shows me stalking a penguin through the eyes of Cheese. You will also see two photos I have already taken of myself.
To snap a photo of yourself place yourself in the position (or goofy face) you want and press the Take A Photo button.
When the photo is snapped it will appear in the lower pane of the application.
Now those photos you have taken have not been saved. You must actually save them before you can use them. To save a photo right click the photo and select “Save As”. By default photos are saved in the ~/Pictures/Webcam directory and can only be saved in .jpg format.
From that same right menu you can choose to send a picture to a removeable device, import the photo into F-Spot, open the photo, or send the photo to the trash. There is one other option “Set as Account Photo”, which is supposed to set a photo to your About me and your login photo. I have yet to get this to work.
Effects
You can even add effects to a photo. You actually add the effects before the photo is taken, and you can add more than one effect if you like. To add effects click the Effects button to list all of the possible effects.
Figure 2As you click on an effect it will be highlighted. Click on as many effects as you like, but know that the more effects you add the slower Cheese will get (especially when adding effects like Vertigo and Warp.)
After you select the effects you want click the Effects button again and you will be returned to the normal screen, only now your photo will be “enhanced” by the effects you have chosen.
You can see the right photo of me was with the Vertigo and the Warp effects running.
Countdown
You will notice, in the Cheese main menu, a Countdown entry. If this entry is checked there will be a delay in the photo taking (so you can make yourself as photogenic as possible.) If you would prefer instant results uncheck that entry and photos will be snapped as soon as you hit the Take a Photo button.
Final thoughts
Cheese is not going to make you a more productive worker. In fact, it’s just fun enough that it might make you a less productive worker. But when you need that interface to your trusty webcam, just say “Cheese” and you’ll be ready every time.
 I had an Ubuntu CD so passed it along and one of my friend(a big fan of linux) was able to install it just fine. The first thing he tells me is that there no icons on the desktop? How am I supposed to browse my files?
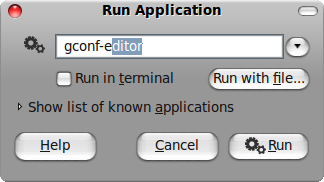 The Configuration Editor will open up. Navigate to
 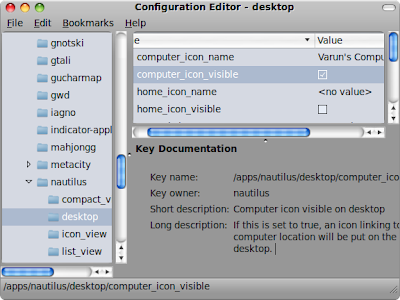 Towards the right side, you'll see some options. Place a check against the icons you want to see displayed on the desktop. You can display the Computer, Home, Trash and Network icons from in here.
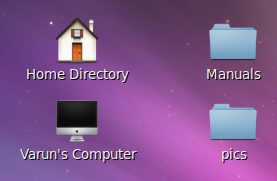 While you are there, you can also think about changing the names. If for example, if you want to change the name from “Computer” to “Varun’s Computer”, all you have to do is double-click on computer_icon_name, choose String as the type and then key in the name you want to give to it.
 You can also uncheck volumes_visible option if you don’t want the mounted drives to appear on the desktop. I personally loathed them, could never get in terms with where they appear (on top of each other at times) and how to customize their positions.


