
This guide is for iPhone 3.0 firmware using the PwnageTool 3.0 for Mac.
The latest Pwnage Tool was released in the morning today. [iPhone Dev Blog]
Before you start, read our jailbreak preparation guide: more after the fold.
Before you start, let me tell you this guide is not applicable for:
- iPhone 3GS
- iPodTouch 2.0
- Unlocking iPhone 3G
Disclaimer: We are not responsible for any damages to your iPhone during the use of our article/video/instructions.
Keep the following in mind before you begin (as of time of this post):
- The PwnageTool is available only for MAC OS
- The newest version of iTunes, iTunes 8.2, is must required
- You can only Jailbreak your iPhone 3G using this tool, you cannot unlock it at this time
- You can Jailbreak and Unlock your iPhone 2.0
- You can Jailbreak iPodTouch 1.0
- You cannot jailbreak and unlock iPhone 3GS
- You must restore your iPhone to the latest firmware 3.0
1. You will need the following files before your start:
- PwnageTool 3.0
- Latest Firmware Files for your iPhone or iPodTouch
- Boot loader Files - you need them only for iPhone 2G
When you download firmware files may be named:
iPhone1,1_3.0_7A341_Restore.ipsw.zip
iPhone1,2_3.0_7A341_Restore.ipsw.zip
Don't UNZIP, change - rename them to
iPhone1,1_3.0_7A341_Restore.ipsw
iPhone1,2_3.0_7A341_Restore.ipsw
3. Back up your iPhone
4. Disconnect the USB cable from your iPhone
5. Turn off/Shutdown your iPhone (Hold Home and Power button until power off slider is shown)
6. You can have iTunes running (it doesn't matter anyways)
7. Start PwnageTool
8. Follow the steps in Pwnage tool
* Accept Copyright and Disclaimer
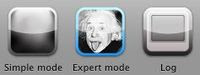
 * Select Simple or Expert Mode (this guide is based on Expert Mode)
 -
- 
* Select Device Type to Jailbreak/Unlock
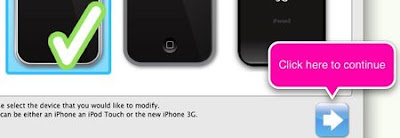 * Click to continue in expert mode, you will see "Browse for IPSW ..."
 * Click "Browse for IPSW ..." and select the firmware for your device
 * After selection you will get to IPSW configuration screen.
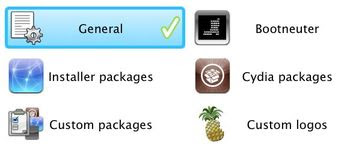
* Configure your custom IPSW file.
- Select First Configuration - General, and click Next (blue button)
 * You'll get to the General Settings Screen. You can uncheck "Activate the phone" setting if your phone was officially activated and you are on a contract with an official service provider. (i.e. if you have an official contract with AT&T)
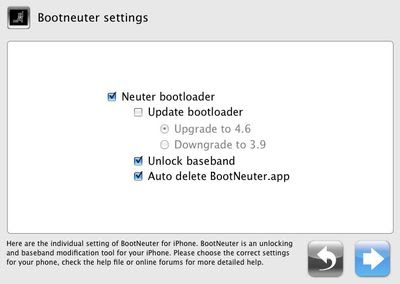
 * If you are using an official service provider you do not need to "Unlock Baseband", therefore you can uncheck that setting. Keep in mind that "Unlock Baseband" will not work on the iPhone 3G (settings will be grayed out) as of the time of this post - you will need to read our ultrasn0w guide when ultrasn0w comes out.
Make sure to put unziped Boot loader Files in the same directory as pwnagetool and they will be located automatically.
 * Settings for Cydia Installer: You can download packages into your custom IPSW file from different sources.

* Use this URL to connect to Cydia Source:
http://apt.saurik.com/dists/tangelo/main/binary-iphoneos-arm/Packages
* Click Next
 * On this screen select Cydia and Icy and click next.
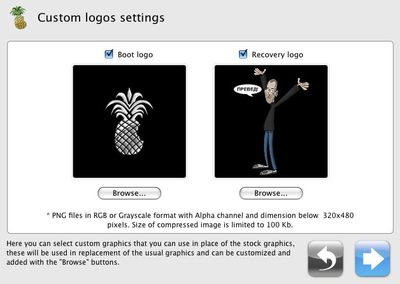
* On this setting screen you can pick your custom logo settings. If you uncheck them both, the originals will remain.
 * When you press Next you will get back to the Settings List screen. Click on "Build" and then "Next".
 * You will be asked for the name and location of your custom IPSW file.
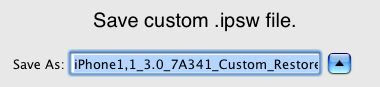 * When you select the file name and location, the custom build process will start.
* During the build process you will be asked for the Username and Password of your computer (the Mac Admin Login). Enter it in so you can continue the build process.
* At the end of the custom build you will be presented with this message:
 * If you are not sure enter no. This is needed for you to enter DFU Mode.
* You will have to follow the instructions in the Pwnage Tool to enter DFU Mode. If you did everything right, you will get the following message:
 9. Connect your iPhone via USB
10. Start iTunes (if you closed it)
11. You will be presented with the message below: iTunes has detected an iPhone in recovery mode. You must restore this iPhone before it can be used with iTunes.
 12. Press OK
13. Now you need to select the custom IPSW file you created. Hold Option/Alt Key and click Restore.
 14. If you are in DFU mode and have created a proper IPSW file, iTunes will restore that IPSW into your iPhone.
Please Note:
- If you get any error during custom restore, follow the How to recover your iPhone guide.
- This jailbreak has been tested on iPhone 2G and 3G
- The Dev Team is working on a method to jailbreak the new iPhone OS 3.0 on a PC.
- PC users may be able to do it now if they can first create IPSW file on a Mac, and then send it over to their PC. Regardless, a Mac is required as of now.


0 comments:
Post a Comment